c program to draw a tree in graphics
Introduction to C++ graphics
Graphics in C++ is defined to create a graphic model like creating different shapes and adding colors to it. It can be done in the C++ console by importing graphics.h library to GCC compiler. We can draw the circle, line, eclipse, and other geometric shapes too. The application of Object-oriented Programming is a primary technique to be used here. C++ does not have any built-in functions to perform drawing as they have low-level programs to use; instead, we can use API to do graphics.
Syntax
The formal syntax is given as:
# include<graphics.h> { Initgraph(); } Few Graphics attributes are:
setcolor(color), setbkcolor(color), setlinestyle(style, pattern,thickness).
How do graphics work in C++?
The graphics are a two-dimensional concept; to implement this, we need implementation and few functions in C++ programming. So, a window or canvas is the main feature to show the output. Since we need a good framework to develop a good feature to draw, here in this article, I have used DevC++ IDE for that we need a certain package in addition to work with Graphics, to download this, we can refer WinBGIm to install the graphics library.
To work with DevC++, we need to download graphics.h and libbgi. a file. The next step is to go to the project and select project options followed by the parameter tab and paste the following in a linker tab: lbgi -lgdi32 -lcomdlg32 -luuid -loleaut32 -lole32.
Many GUI programming is stopped in C++ because they don't have the default graphics library.
To work with graphics, we need a few essentials before entering the code.
1. Co-ordinates: This specifies how points are placed in a window; the initial origin of the screening point is assumed as (0,0). This co-ordinated system depicts how and where to perform a draw option is specified. The Graphics screen has 640 X 480 pixels.
2. Basics of Color: The default color elements are red, green, and blue; the output of all these colors confines to the pixels of the screen. To set a color, we can use setcolor (number); The number specifies the color code; for example, a number 14 is given for yellow. Shading and coloring add extra effects to the image.
Few functions make the code more attractive, which works well in graphics mode.
- BLINK: It helps to blink a character on the screen window.
- GOTOXY: It helps to move a cursor to any position on the screen.
- Delay: It suspends a few sections. For example, to move the next car. It waits for a while.
- Position functions like getmaxx(), getx() and gety().
Ok, let's go with the working steps in graphics code.
- The first step is to include a header file GRAPHICS.H with a graphic function, and graphic.lib has built-in library functions.
- Next is to include a function initgraph () which starts the graphic mode and comes with two variables gd, a graphic driver and gm, graphic mode. followed by this, we can use a directory path.
- Closegraph () – This function shifts the screen back to text mode. To end the program, this function is used; it flushes the memory used before for the graphics.
- clear() – It returns the cursor position to (0,0).
- circle () – Creates a circle with a given radius.
- line () – Creates a line with starting and ending points.
For example, to draw a simple line or a circle, the following parameters are added.
- lineto(x,y): it moves from the current position to the user-defined position.
- circle (x, y, radius): To draw a whole circle, we need a center radius.
- rectangle (x1, y1, x2, y2): where x1, y1 is the upper left side and the lower right is x2, y2.
Examples of C++ graphics
Here I have given a sample program on how to work on the graphics mode and development process in devC++.
Example #1
To draw a triangle in C++ using graphics
Code:
#include <graphics.h> #include <iostream> int main() { int gd = DETECT, gm; initgraph(&gd, &gm, ""); line(140, 140, 350, 100); line(140, 140, 200, 200); line(350, 140, 200, 200); getch(); closegraph(); } Explanation
The above simple Code draws a line of x1, y1, x2, y2 points on a screen. Gd, gm is a graph mode for a function initgraph. The generated graphics window of the above code is shown as:
Output:

Example #2
Creating a Home Page with Rectangle shapes and text
Code:
#include<iostream.h> #include<conio.h> #include<graphic.h> #include<math.h> void main() {clrscr(); int g=0,a; initgraph(&g,&d,""); setbkcolor(14); setcolor(6); settextstyle(2,0,4); outtextxy(180,130,"G"); setcolor(5); settextstyle(2,0,4); outtextxy(120,120,"O"); setcolor(6); settextstyle(2,0,4); outtextxy(300,120,"O"); setcolor(5); settextstyle(2,0,4); outtextxy(250,130,"G"); setcolor(2); settextstyle(2,0,4); outtextxy(360,160,"L"); setcolor(3); settextstyle(2,0,4); outtextxy(310,130,"E"); setcolor(9); settextstyle(2,0,4); setcolor(8); settextstyle(2,0,4); outtextxy(110,250,"surf"); settextstyle(2,0,4); outtextxy(350,320,"Go AHEAD"); setcolor(6); rectangle(130,210,450,210); rectangle(90,310,170,340); rectangle(360,320,510,320); getch(); } Explanation
The above code draws a rectangle shape along with text in a different color.
Output:

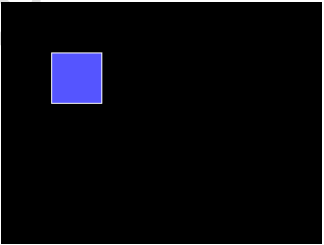
Example #3
Code:
#include<stdio.h> #include<conio.h> #include<graphics.h> #include<dos.h> void flood(int,int,int,int); void main() { int gd,gm=DETECT; clrscr(); detectgraph(&gd,&gm); initgraph(&gd,&gm,"C:\\TurboC3\\BGI"); rectangle(60,60,90,90); flood (50,50,8,0); getch(); } void flood(int a,int b, int fcol, int col) { if(getpixel(a,b)==col) { delay(15); putpixel(a,b,fcol); flood(a+1,b,fcol,col); flood (a-1,b,fcol,col); flood (a,b+1,fcol,col); flood (a,b-1,fcol,col); } } Explanation
The above code flooded a shape with the text color.
Output:
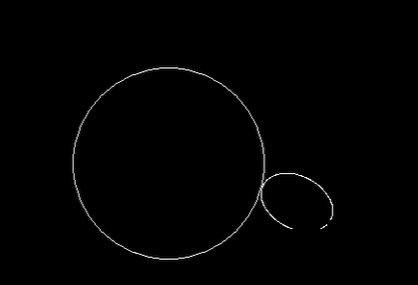
Example #4
Code:
#include <conio.h> #include <graphics.h> #include <iostream> #include <math.h> #include <stdio.h> #include <stdlib.h> using namespace std; void ellipsedr(int e1, int e2, int a1, int b1, float alp, int color) { float tt = 3.14 / 180; alp= 360 - alp; setcolor(color); int tetaa; for (int j = 0; j < 360; j += 1) { tetaa = j; int x1 = a1 * cos(t1 * tetaa) * cos(t1 * al) + b1 * sin(t1 * tetaa) * sin(tt * alp); int y1 = b1 * sin(t1 * tetaa) * cos(tt * alp) - a * cos(tt * tetaa) * sin(tt * alp); putpixel(e1 + x1, e2 - y1, color); } } void view(int e1, int e2, int rr, int a1, int b1, int alp, float pp, int color) { setcolor(color); float tt = 3.14 / 180; float ta, tb, d; float angle = (pp * alp); ta = cos(t * fmod(angle, 360)); tb = sin(t * fmod(angle, 360)); ta*= ta; tb *= tb; ta = ta / (a1 * a1); tb = tb / (b1 * b1); d = sqrt(ta + tb); d = 1 / d; int gox = e1 + (rr + d) * cos(tt * alp); int goy = e2 - (rr + d) * sin(tt * alp); int goang = angle + alp; ellipsedr(gox, goy, a, b, draw_ang, color); } void elipsecirc(int xc, int yc, int rr, int a1, int b1) { float tetaa = 0; double hei, pi1; hei = (a1 * a1) + (b1 * b1); hei /= 2; pi1 = sqrt(hei); pi1 /= rr; pi1 = 1 / (pi1); for (;; tetaa -= 1) { view(e1, e2, rr, a1, b1,tetaa, pi1, WHITE); circle(xcir, ycir, rr); delay(25); view(e1, e2, rr, a1, b1,tetaa, pi1, BLACK); } } int main() { int gd = DETECT, gm; initgraph(&gd, &gm, ""); int mx = getmaxx(); int my = getmaxy(); elipsecirc(mx / 2, my / 2, 90, 30, 26); closegraph(); return 0; } Explanation
The above code displays an ellipse over the circle by setting x and y coordinates.
Output:
Conclusion
In this article, we have described how graphics work in C++ programming. We have presented simple and general functions used in graphics to do programming. We have also discussed the design and example process to understand the concept.
Recommended Articles
This is a guide to C++ graphics. Here we discuss how graphics work in C++ programming and Examples along with the codes and outputs. You can also look at the following article to learn more –
- C++ absolute value
- C++ thread( )
- C++ sort()
- C++ reserve()
Source: https://www.educba.com/c-plus-plus-graphics/?source=leftnav
0 Response to "c program to draw a tree in graphics"
Post a Comment